In 2001 I had a Columbia 36 sailboat for a few months. The Columbia was an amazing learning experience, as, among other things, I replaced its old Atomic 4 engine with another old Atomic 4 engine! I ended up doing this with help from some other folks — thank you. I did some of the “heavy lifting” on my own — a terrifying and empowering experience.
The Atomic 4
The Atomic 4 in my Columbia 36 died shortly after completing the purchase of the boat. After deciding not to attempt a rebuild of the existing engine, I had to figure out how to get it out, and what to do to replace it.
For reference, the Atomic 4 is a thirty horsepower gasoline fueled marine engine produced from the 1940s to the 1980s. It was installed in thousands of sailboats — sort of a defacto standard for many years. Gasoline, being a volatile fuel with fumes that tend to collect in low places — such as boat bilges — is no longer used to power sailboats; diesel engines now provide auxilliary power with greater reliability and without the risk of explosion.
Because so many sailboats were equipped with Atomic 4 engines, especially during the 60s and 70s, many are still in use today. As these engines have aged, several companies began providing aftermarket parts, manuals and support. Today, you can purchase all of the parts new, including newly cast engine blocks! The Atomic 4 has had something of a second wind, mostly due to the efforts of the folks at Moyer Marine.
Getting it out
Rich, the harbormaster at RYC, suggested using the main halyard, boom and mainsheet to pull the engine out (thanks Rich). I was a little skeptical, but since I had some time, I figured I’d give it a shot. Friends Toby and Justin came out to help disconnect everything. Finally, it was ready to be lifted out. After setting up the blocks for hoisting, I held my breath, and gave a tug on the mainsheet — it started to come up. I managed to pull it out of the engine compartment and on to the cabin floor.
The next step was to pull it about three feet straight up and out to the cockpit. More holding my breath, since this step could turn into a real problem if something went wrong. But it went fine and the engine was sitting on the cockpit floor. At this point I realized I would need something to put the engine on, so I drove over to the Richmond Costco to find a pallet. A really cool warehouse employee let me grab one from behind the loading dock. Nice; back to the boat.
After adjusting the “lifting rig” back a couple feet, I hoisted the engine up to the cockpit seat. One more lift to the side of the boat. Using a rope tied to the dock piling, I managed to swing it out and gently lower it to the waiting pallet. Sweet success. Of course, it didn’t occur to me to take pictures of the whole process, but I did get a shot after it was on the pallet.
Replacement options
So now it was time to decide how to replace it and how to pay for it. Westerbeke makes a diesel engine with dimensions very similar to the Atomic 4. Unfortunately, the Columbia’s galvanized steel fuel tanks would need to be replaced — though several folks advised I could “get away” with skipping the tank replacement. In fact, we had a lively discussion on the CYOA list about using diesel with the existing tanks (thanks everyone who contributed to this discussion). No matter what a new engine would cost a lot of cash.
Then I got an email from Geoff, a friend who had recently purchased a wooden bird boat that also had an Atomic 4. Since he wanted to restore the boat for racing, the 350 pound iron block under his cockpit needed to go. Thank you Geoff! We made plans to pull the motor out of the bird boat so I could cart it away and install it in the Columbia.
Getting it out — again
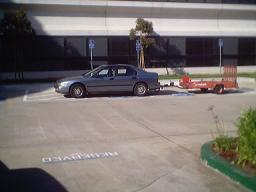
On Saturday, I rented a trailer to haul the motor. I had installed a hitch on my Honda last summer for another boat related project. Of course, if I had realized what kind of things I would end up towing, I would have opted for a truck instead of buying a sedan last year. In any case, I thought the picture of the Honda with the trailer was amusing.
We met at the dock at 11am on Sunday morning. The SF municipal marina is old and run down, which is interesting since it’s a stone’s throw from some of the most expensive marinas on the bay (the St. Francis Yacht Club is next-door). Luckily, old marinas tend to have lots of old junk, pieces of wood, unused ropes and whatnot, which come in handy for do-it-yourself projects.
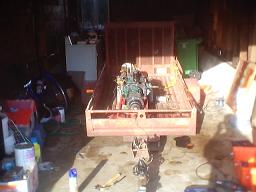
Disconnecting the engine was remarkably simple, as it was installed in a more-or-less open area. Geoff cut off the old exhaust pipe, we removed the wiring and mounting bolts, then used a block of wood that was sitting on the dock to slide it out from under the cockpit. Unfortunately we couldn’t use the boom/halyard, as the boom was sitting on the dock where Geoff’s wife Miriam was removing old paint. Once again, scavenging some junk from the dock gave us what we needed. We used a wooden box and a large piece of foam (along with the utility dolly I had rented and my mainsheet/blocks) to lift it into the cockpit. I wish I had remembered to snap a picture, as it was quite a thing to see.
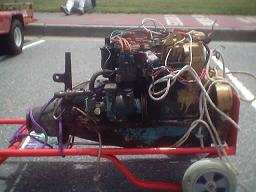
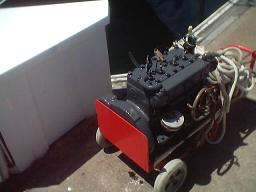
Then the two of us lifted it from the boat to the dolly, now waiting on the dock. I don’t recommend doing this unless absolutely necessary, as the weight of the engine could easily cause back problems if lifted incorrectly. I came away with a bit of a sore back, but didn’t do any real harm. Once we’d cleaned up the bird a bit, we hauled the motor up to the trailer. I pulled it home for cleaning and painting.
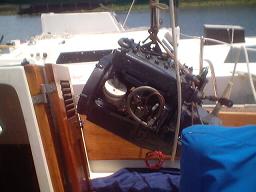
Some Atomic 4 history
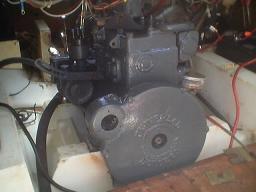
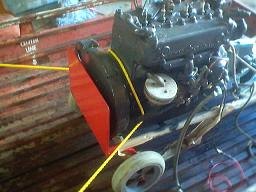
It was interesting to see that the engine had, over the years, been painted orange, red, light blue, green and yellow. The other cool thing was the date stamped on the block — it was cast in 1957! There were two A4 models — this one is definitely the “early” model — they didn’t even have thermostats in the beginning. Even though it was an early model, it had been upgraded to an electric fuel pump at some point.
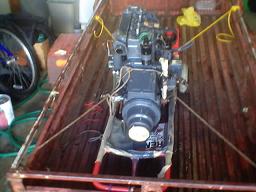
Cleaning and painting
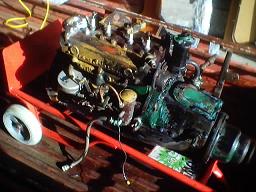
Once the engine was secured in my garage, I pulled out the engine degreaser and started cleaning. Most of it was covered in green paint, though the flywheel was yellow. I sanded and scraped as much as I could, given the limited time (I wanted to have it in the Columbia the next day, Monday). After using a Naval Jelly type product to neutralize rust, and letting it dry, it was time to paint. I decided on a dark gray, and began painting late that night.
The next morning I hauled the motor across the bay to Richmond, to install in the Columbia. I’m sure the Honda pulling an engine across the Golden Gate Bridge must have looked a bit unusual to all of the tourists.
Getting it in
I was pretty tired by this point, but I wanted to at least get the “new” Atomic 4 into the boat. I wasn’t sure if I would have the time or energy to actually install it on the mounts, but I figured once it was onboard I could return the rental trailer and proceed at my own schedule.
Once I got to the marina, I basically reversed the process I had used to remove the original engine, and used the boom/halyard/mainsheet/block system to lift the engine off the dolly and lower into the boat. I was much more confident about the procedure, and had the engine in the cabin in about 5 minutes.
Since that went so quickly, I decided to try getting it into place. I pushed it back and it got stuck in front of the rear mount. So I moved my lifting rig back, lowered a rope through a small access hatch in the cockpit, and tied it to the engine at the transmission. A few more tugs on the sheet, and she dropped into place.
Next was the fun process of squeezing myself into the tiny engine compartment and trying to get the prop shaft lined up. I still had the old spacers, and it was close, but not close enough. I ended up using some extra washers to bring the flywheel end up just a bit. I think the alignment is pretty good, though probably not exactly perfect. The shift cable attached easily. Next steps are the exhaust, throttle cable and wiring everything up…
The hook-up
Jeannie and Jerry came up to help get this thing sorted out. Jerry and I, over the course of a day, managed to get the alternator installed and the wiring done, or so we thought. After checking the wiring diagrams, there were a couple of changes and additions.
A day later, the exhaust was connected and we could crank the starter. Finally the engine roared to life…